10 Simple Drills That Can Be Done With A Rebound Board
Share
Master Your Touch, Technique, and Timing With Just One Piece of Equipment
Want to sharpen your first touch, boost your reaction speed, and improve your ball control — all without needing a training partner? This guide breaks down 10 effective rebound board drills you can do solo, using just a ball and a rebounder board. Whether you're training in the garden, at the park, or on the pitch, these drills are designed to simulate real-game scenarios, enhance both your dominant and weaker foot, and build muscle memory through skill progression.
We’ll cover drills for:
- Solo passing and receiving
- First touch mastery
- Shooting and volleying
- Agility and dribbling routines
- Multisport adaptations
- And more — all while highlighting the rebounder’s versatility as a compact training tool.
Perfect for youth players, professionals, or hobbyists looking for individual practice options that work in limited space.
Why Train with a Rebounder Board?
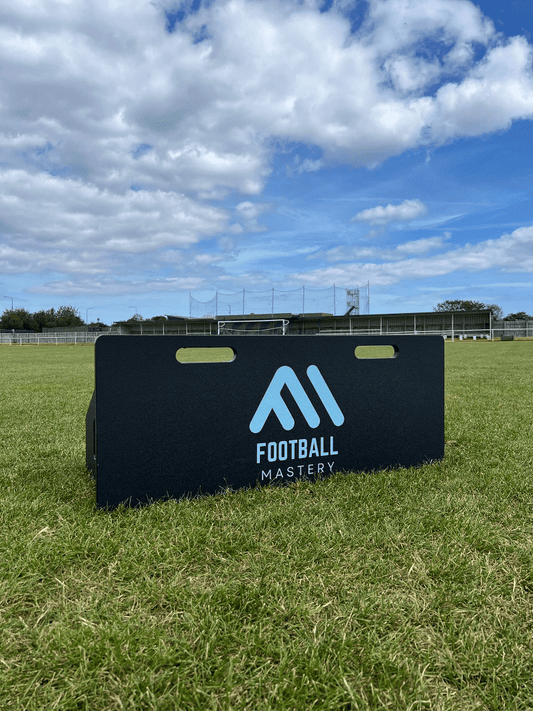
A rebounder board — also known as a kickwall, bangboard, or rebounder wall — is one of the most versatile training tools for any footballer. Unlike static cones or poles, it gives instant feedback through return trajectory, encouraging active adjustments in real time.
“The rebounder doesn't lie — your touch either sticks or it doesn't. It's like having a silent coach that demands precision.”
Whether you're working on your one-touch passing, volleys, or developing your reaction time, the board replicates dynamic match scenarios — without needing a teammate.
Want to see what a quality rebounder setup looks like? Check out our rebound boards designed for both grass and hard surfaces.
Drill 1: One-Touch Passing Challenge
A staple drill, but always worth revisiting — especially if you're focusing on footwork drills and ball control under pressure.
How to do it:
- Set your rebounder board at a low to medium angle.
- Stand 3-4 metres away.
- Play the ball using the inside of your foot, aiming for consistent one-touch passes.
- Try alternating feet every five passes.
Progression ideas:
- Limit to your weaker foot only.
- Increase distance and speed.
- Add a cone gate to simulate a target zone for receiving.
Great for developing first touch, foot dominance training, and passing accuracy.
Drill 2: Two-Touch Control & Pass
This drill slows the pace slightly to focus on clean ball reception followed by deliberate passing. A great tool for building muscle memory and improving technical footwork.
Steps:
- Set the board at a steeper angle.
- Trap the ball on the first touch using your sole, thigh, or inside foot.
- Pass it back with precision.
Introduce angle variation to challenge your coordination drills and simulate unexpected rebounds — just like a deflection in a match.
Need something that suits tight spaces? Our compact rebounder range is ideal for garden-friendly drills.
Drill 3: Touch, Turn & Dribble
A more match-realistic drill, perfect for incorporating multidirectional movement, decision-making, and dribbling techniques.
How to perform:
- Pass into the rebounder.
- Receive the ball and immediately perform a 180° turn using the sole or a pull-back move.
- Dribble through a set of cones before returning to start.
This drill supports agility training, improves ball bounce analysis, and introduces game simulation patterns.
Coaching tip: Vary cone placement to simulate midfield congestion and build spatial awareness.
Drill 4: Keepie Uppie Rebound
This one's for developing your juggling skills under pressure. The board adds unpredictability, forcing rapid reflex training and control. This one is perfect to do with our rebound nets (coming soon).
Routine:
- Juggle the ball a few times.
- Pass it into the rebounder.
- As it returns, continue juggling without letting it drop.
Track your max sequence, and try adding a header or thigh trap into the mix.
Want to incorporate this into team sessions? See our ideas for youth training on the Football Mastery blog.
Drill 5: Target Shot Rebound
Shot accuracy is more than just power — it's about control and consistency. This drill builds both.
Drill setup:
- Place cones or tape to mark target zones on the rebounder.
- Take shots from 8-10 metres.
- Aim to hit specific targets with your instep or laces.
- Receive the rebound and repeat.
This drill sharpens finishing, develops the rebound prediction instinct, and supports goalkeeper-specific drills (when done with a partner in goal).
Want to take your finishing to the next level? Pair this with the Football Mastery Shooting Target Sheet for added precision.
Drill 6: Reflex Volley Circuit
If you're looking to train fast-twitch reactions, hand-eye coordination, and explosive technical footwork, this is the drill for you.
What you need:
- Rebounder board angled sharply.
- A partner or wall to serve balls rapidly, or simply serve them yourself.
Drill method:
- Feed the ball into the rebounder.
- As it returns, execute a first-time volley using laces or instep.
- Continue the sequence for 30-second intervals.
Try using both feet alternately. This drill mimics high-pressure attacking scenarios like crosses or cutbacks, making it perfect for volleying drills and reaction time development.
Advanced variation: Include side-steps between volleys to add an agility training element. You’ll not only improve footwork but also build speed and endurance.
Drill 7: One-Two Wall Pass Drill (Give-and-Go)
This one’s ideal for game simulation and building fluidity in self-passing movements. Often referred to as a wall pass or give-and-go, it mirrors the kind of quick play required in tight midfield or final-third scenarios.
How to perform:
- Approach the rebounder diagonally.
- Play a pass, sprint into space, and receive the return.
- Repeat the motion on both sides to train multidirectional movement.
You can pair this drill with cones to act as defenders or simulate tight channels to improve ball control and decision-making under pressure.
Want to see how to structure these kinds of technical drills into a full session? Take inspiration from the Football Mastery Skills & Drills Program for structured routines you can do anywhere.
Drill 8: Heading Accuracy & Air Control
A rebounder isn’t just for your feet. This drill helps develop heading accuracy, throw-in control, and ball tracking in the air — vital skills for both attackers and defenders. This drill is perfect with our rebound net (coming soon).
Setup:
- Use a throw-in technique to serve the ball into the rebounder.
- Aim to receive it back for a header — into a net, target, or zone.
- Track the rebound flight to anticipate and respond accordingly.
Use painter’s tape or visual markers to establish target zones on the wall — practicing both offensive (downward headers) and defensive (clearing headers) styles.
This is particularly useful for goalkeeper-specific drills too, where keepers track rebounds and come off their line to claim or punch.
Looking for a rebounder that holds up to headers and power shots? Our Pro-Grade Rebound Wall is tested under match-level intensity.
Drill 9: Trap & Explode
This combination drill blends trapping, first touch control, and acceleration.
How it works:
- Pass into the board from 6–8 metres.
- Receive using your chest, thigh, or foot, depending on the rebound height.
- On the first touch, explode into a sprint, or perform a feint-turn-dribble to simulate evading a marker.
The goal here is to move immediately after receiving, simulating real match transitions. It’s excellent for fitness and conditioning while embedding natural responses to rebound trajectories.
Drill 10: Rebound Combo Circuit (Multi-Touch Drill)
The final drill in our series is a full-body combo circuit, combining footwork, touch control, and shooting drills in a flowing routine.
Drill flow:
- Start with two-touch passing into the board.
- Follow with a turn-and-dribble sequence.
- Reposition for a one-touch volley.
- Finish with a target shot on a goal or cone zone.
Repeat this circuit continuously for 3–5 sets. It mimics the kind of varied, chaotic movement players experience in small-sided games, promoting coordination, reflex training, and technical repetition under fatigue.
This is where you really feel the value of training with a high-quality, compact rebounder that can keep up with every touch, hit, and sprint.
How to Get the Most from Your Rebounder Training
"Drills are only as good as your consistency. Repetition builds instinct, but variation builds adaptability."
To level up:
- Track progress: Count successful touches, volleys, or dribbles.
- Vary angles: Adjust your board frequently to change the return trajectory.
- Use both feet: Build confidence in your weaker foot through dedicated reps.
- Add defenders or time limits: Introduce realistic constraints for game-like feel.
Looking to expand your toolkit? The Football Mastery Rebounder Collection includes boards designed for all surfaces and player levels.
Multisport Mastery: Beyond Football
The rebounder board isn’t limited to just football. Its true power lies in multisport compatibility — helping athletes from various disciplines develop ball handling, reaction time, and precision under pressure.
Here’s how you can adapt your board training for other sports:
⚽ Volleyball (Smash Technique & Set-Up Drill)
- Set the rebounder at a 30–40° angle.
- Serve the ball into the board and prepare to smash or set the return.
- Alternate between underhand and overhand touches to mimic real match rallies.
This is perfect for improving upper body control, timing, and spike execution. Great for set-up practice too — ideal for both attackers and liberos.
🏑 Hockey (Passing & Trapping)
Use a low-angle board to mimic puck rebounds. Practice forehand/backhand trapping, low passes, and fast flick shots.
Helps develop puck control, coordination, and angle awareness. It’s especially useful for indoor or garden-friendly hockey drills where space is limited.
🧤 Handball / Goalkeeper-Specific Drills
For keepers and handball athletes:
- Stand 3–5 metres away.
- Throw, kick, or deflect balls into the rebounder and respond with dives, jumps, or parries.
- Use high-angle setups for aerial saves and throw-in reaction practice.
These sessions build hand-eye coordination, reflex agility, and rapid position recovery.
Looking to incorporate these into your own training? Browse the Football Mastery Training Accessories for tools that complement rebounder-based routines across sports.
Developing Youth Players with the Rebounder
Rebound boards are especially impactful for youth training. Why? Because young players need high-repetition, engaging, self-correcting tools that encourage independent learning — and that’s exactly what a rebounder provides.
Key Benefits for Youth Footballers:
- Builds confidence in solo settings.
- Encourages skill progression and creativity.
- Reinforces muscle memory through constant repetition.
- Mimics match scenarios without overwhelming complexity.
Try these simple youth-focused drills:
- Name That Touch: Have players call out the surface (foot, thigh, head) before the rebound returns.
- Two-Step Reaction: After playing a pass, they must sidestep two cones before receiving — promotes speed and balance.
- Timed Challenges: 60-second passing marathons with goals like “30 one-touch returns.”
Looking for a full structured program for young players? The Football Mastery Academy Bundle is packed with age-appropriate content for long-term development.
Customising Your Rebounder Routine
To truly master the 10 simple drills (and then some), structure your sessions around your goals and skill level.
Sample Weekly Rebounder Plan:
| Day | Focus Area | Drill Examples |
|---|---|---|
| Monday | First Touch + Passing | Drills 1 & 2 |
| Tuesday | Ball Control + Turning | Drills 3 & 9 |
| Wednesday | Rest or Light Coordination | Multisport light drills |
| Thursday | Volleys + Shooting Accuracy | Drills 5 & 6 |
| Friday | Reflex + Speed & Endurance | Drills 4 & 10 |
| Saturday | Game Simulation Scenarios | Drill 7 + custom circuits |
| Sunday | Recovery + Light Touch Play | Drill 8, juggling, or youth mini-games |
Pro tip: Always include a warm-up routine before sessions and finish with some light stretching or cool-down juggling.
Final Thoughts: Make the Rebounder Part of Your DNA
You don’t need 11 players, a coach, or even a full pitch to become a more intelligent, technically sharp, and creative player. The rebound board is your silent trainer — honest, consistent, and ready 24/7.
From one-touch passing and first-touch control to volleys, agility, and multisport crossover, the 10 drills we’ve explored are just the beginning. Layer them, remix them, and elevate them as your technique evolves.
Ready to build your at-home training hub?
Explore our curated selection of Football Mastery rebounder boards. crafted to meet every training scenario — from garden kickarounds to professional-level prep.
Frequently Asked Questions (FAQ)
1. How much space do I need to perform rebounder drills effectively?
Most drills can be done in as little as 3–5 metres of space. A garden, driveway, or small training area is typically enough, especially if you're using a compact rebounder. Just ensure there’s room for ball return and safe footwork.
2. Do I need special footwear when training on different surfaces?
Yes. For grass or turf, studded or molded boots are ideal. On hard surfaces (e.g. concrete or indoors), use flat-soled athletic shoes to maintain grip and avoid injury.
3. Can I perform these drills with any ball, or does it need to be a match-quality football?
While a standard size 5 match ball is recommended for realism, training balls, lightweight skills balls, or even foam balls for indoor use can work — just note that rebound speed and bounce may vary depending on the ball's material and weight.
4. Are rebound boards suitable for younger children (ages 6–10)?
Absolutely. Just ensure you choose a youth-friendly rebounder with a smaller frame and a forgiving surface. Start with light drills like trapping, simple passes, and low rebounds to build confidence.
5. How do I stop the rebound board from moving during powerful shots?
Most high-quality boards are built with weighted bases, anti-slip feet, or ground anchors. If your board moves, try placing it against a wall, anchoring it with weights, or using rubber mats underneath for extra grip.
6. How often should I practice these drills per week for noticeable improvement?
For consistent results, aim for 3–5 sessions per week, with each lasting 20–30 minutes. Focus on quality reps, progressive intensity, and always include rest and recovery to avoid fatigue or burnout.
7. Can I use rebound boards in wet or rainy weather?
Yes, but ensure your rebounder is made from weather-resistant materials like powder-coated steel or treated plywood. Dry off the board after use to extend its life, and avoid slippery surfaces for safety.
8. What’s the difference between a flat rebounder and an angled one?
-
Flat rebounders return the ball directly and are best for first touch and short passing drills.
-
Angled rebounders offer varied return trajectories, making them ideal for volleys, heading, and reaction-based drills.
Advanced setups allow you to adjust the angle for drill variation.
9. Do I need a goal or target behind the rebounder to make the drills effective?
Not at all. Many drills focus on touch, control, and agility — not goal-scoring. However, if you're working on finishing or accuracy, adding a goal, cones, or target zones can be useful.
10. Can rebounder training fully replace team practice?
While it’s a powerful tool for individual skill development, rebounder training should complement, not replace, team practice. It’s best for improving technique, reflexes, and confidence, which translate well to game play when combined with match experience.
